How to set up free automated backup for your WordPress website

Why you need website backup? Well, you get an awesome looking and functioning business WordPress website. What if a hack or malware attack made to your site? What if your website files got corrupted?
A complete website backup is a life saver in those cases. All you need to do is simply restore the backup and you are saved from frustration and hours of hard work.
This detailed actionable post will help you set up free WordPress website backup on regular basis with little or no intervention.
Are you a novice WordPress website owner or just starting up with blogging? Probably you may look for a free and reliable maintenance solutions.
Well, this indeed is a free and automatic way of backing up your website. Let’s start without wasting much of your time.
Automated way:

I know you are a busy person and you are looking a solution that works in a more autonomous way. Let’s explore the solution that works with just a few clicks and handles the rest of the process by itself.
I am more interested in a free plugin based approach that keeps your website’s backup at your preferred cloud storage service. And help you restore that backup when you need it. I am talking about updraftplus plugin.
Why I chose the UpdraftPlus when there are hundreds of other plugins available? That is simply because this is the well managed and feature packed plugin that is free of charge. You will be joining the 900k+ user family and you will get regular updates. Seriously this makes an irresistible choice, isn’t it?
Let’s install the UpdraftPlus plugin without wasting your time:
UpdraftPlus Install:
If you prefer the video over text please see the video on how to install the plugin.
Step by step instructions:
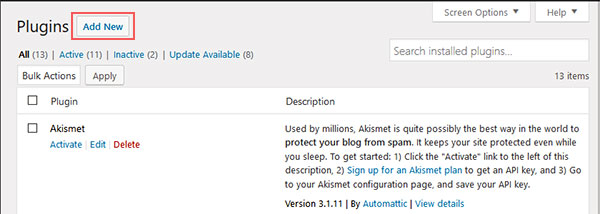
Please login to your WordPress admin panel and click on the plugins from the left navigation menu as shown in the image below.
Once you have land to add the new plugin page, you need to locate the search bar, type UpdraftPlus and hit search. You will get the result like the image below:
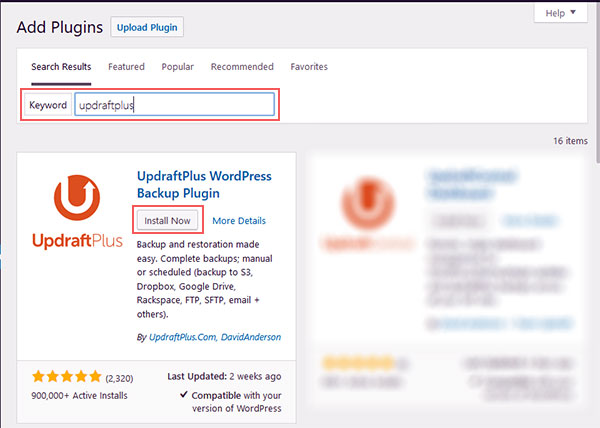
You need to click Install Now and hit Activate once installation is completed. Congratulations you now have completed the Updraftplus plugin installation.
Configuring the plugin:
This is how the plugin works: The plugin takes the backup of your WordPress website and transfers the backed up files to your selected cloud storage provider. To maintain the ease I will walk you through the process and select the Dropbox as the cloud storage provider.
Now go to settings and select UpdraftPlus from the left navigation. When making selections, you need to select the Settings tab as shown in the image below:
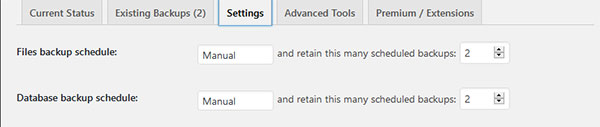
You can now set the scheduling either automatically or manually. You can pick an option (4 hours, a day, a week, a month) from Files backup schedule & Database backup schedule. The automatic backup takes place by themselves on specified interval while the manual mode needs your action for backups to take place.
What frequency should you select? Depending on how frequently you update your site, you should choose once a week if you are updating the website once every seven days. Keeping daily update frequency would make sense in the case of a daily updating website.
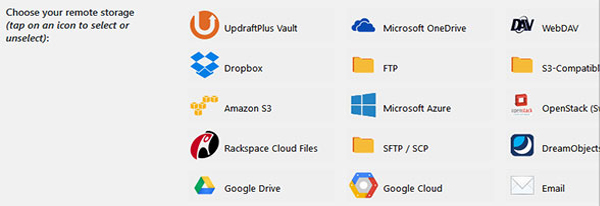
Cloud Storage:
The plugin will upload the backup files to your preferred cloud storage provider. You have plenty of options to choose. Below is the image how I configured the Dropbox as my cloud storage provider:
You need to select the Dropbox. Once you click it, you will see a new section on the page like the image below:

It says you need to authorize UpdraftPlus app to your Dropbox account. Do not panic, it will create only a directory and it will have access to that only. Once you click the icon, you will find the authorization window like below:
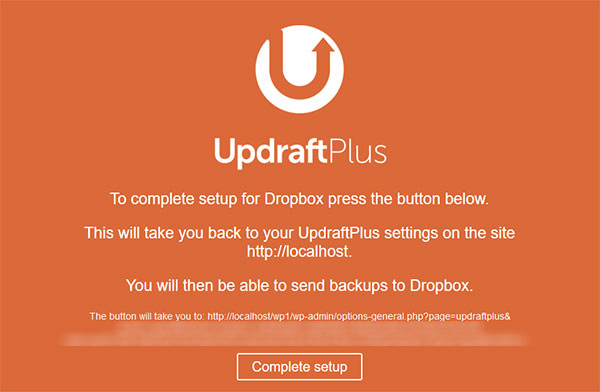
Just click the complete setup and you are good to go.
Once these configurations performed, please hit the save setting button.
Backup Website:
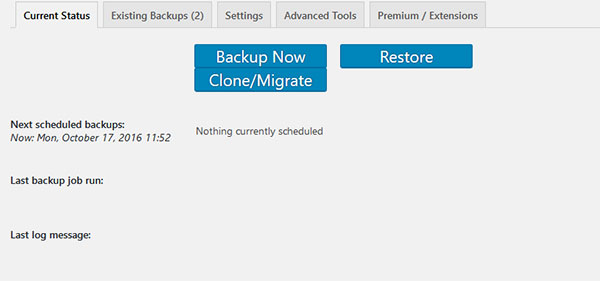
Finally, it is time to perform the website backup, what actually we are here for! Click the Current Status tab and you will find the Backup Now button. Just press it! It will take the website backup and transfer it to your authorized Dropbox account as a backup. Simple right?
The backup process time will depend on the size of your website as it has to compress the backup data and transfer the backed up data to your Dropbox account.
Other Backup Option:
If you do not prefer using Dropbox to any other solutions mentioned, you can manually copy them to your local computer. How? If you know to work with FTP, it’s a matter of a minute. The plugin basically creates the backup archive into the wp-content/UpdraftPlus directory.
Now you first need to run the backup of your website. Connect your FTP application to your server and point to the directory mentioned . You will find the backup file(s). Select them and hit the download button. That’s it!
You do not necessarily have to use the cloud storage for this purpose. But this plugin aims at non-tech people. It would be a good idea to configure cloud storage if you wish to take automatic backup and stored in secure place.
Restore Website:
As stated in the beginning, in a case of hack or malware attacks and accidental configuration file changes, a complete website backup proves to be a life saver.
Let’s assume you were the victims of a malware or a hacking attack and you need to clean your website. I hope this will never happen. But if it happens here are the steps you can take.
The plugin by default takes backup of everything right from plugins, media, files to your theme(s). Everything that matters to your website is included in the backup. You need to clean up your website.
If you are going toward to the clean WordPress installation route, follow these steps:
- Install and setup WordPress framework
- Install UpdraftPlus plugin
- Restore the backup from cloud storage
And your site will be up and running again. It has all the pages, posts, themes, plugins and media files that your site had on the last backup.
Let’s break down the last restore part. Both the first and second points are easy to execute and pretty straightforward. The restoring process needs some work like that, let’s get that part in detail now.
When you configure a cloud storage provider for your website backups, the plugin sends those backup files to your cloud storage. So to restore your backups you may first need to download all backup files.
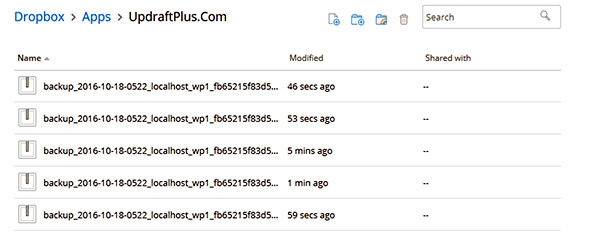
As I have kept Dropbox as my cloud storage provider, backup files will be stored like an image shown above. If you have kept the default settings on UpdraftPlus and selected Dropbox as cloud storage provider, all your backup should be stored under Apps/UpdraftPlus.com directory in Dropbox.
Now we need to upload these backups files to your web server and to do that we have two options.
Use the plugin’s backup upload feature
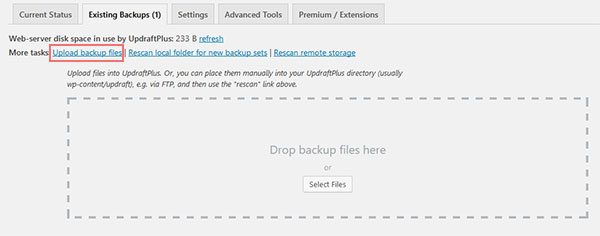
You need to press the Upload backup files link and that will display a dialog underneath to upload file(s). Indeed it is easy that you just need to drag your files and it starts uploading them to the server.
But it has a size limitation. If your backup files are large in size i.e 100+ MB you may need to consider the second option.
Use FTP program to upload files:
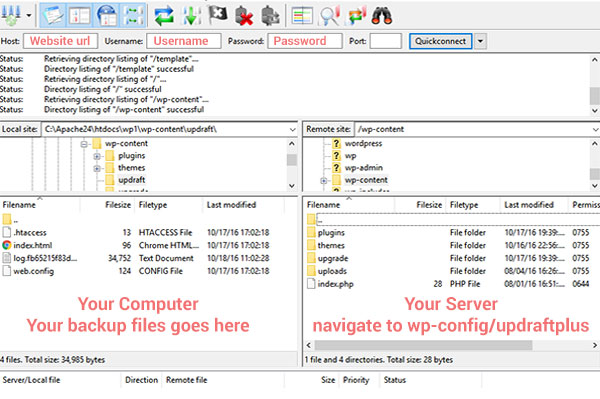
You may consider using an FTP program, I am using FileZilla FTP in above image. You just need to know your server’s FTP credentials and it will connect in a fraction of a second to your server.
Now connect the FTP application with your server. You will see the application UI is divided into two parts. The left part points to your local computer and the right part points to your server directories.
The left portion should point to the backup files on your computer. And the right part should point to the wp-content/UpdraftPlus directory. Now you need to select all the files on the left part, right- click there and select upload to start the uploading process.
Back to Plugin:
Go back to your UpdraftPlus dashboard once the uploading process completes. Click the Rescan local folder for new backup sets link under Existing Backups tab. And it should find the backup files you just uploaded like the image displayed below:
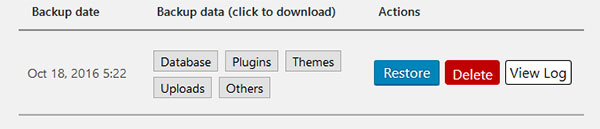
You guessed it right, you need press the restore button. When the restore button pressed you will see a popup like an image below. It let you select what data you want to restore, i.e theme, plugins, uploads, database, and others.
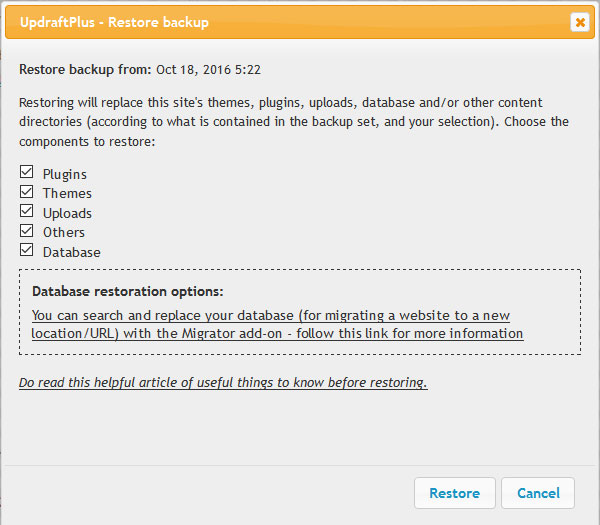
After selecting to hit the restore button, it will restore all the data to your website. It works as we expect.
Have I tested it?
Yes, before writing this post, I have created a WordPress website on my local development server. I checked backup, Dropbox integration, and restore functionality before suggesting you a solution.
Test case:
Here is the test case that I ran. I created a test WordPress website with a couple of plugins, themes, pages, posts and some media resources. I configured the Dropbox with the plugin and took a complete manual backup of the system.
Then I created a new local WordPress website for restore testing. I know this will be a migration than a legit restore. But I really want to check what works and what not. So I create fresh WordPress install on another directory.
Installed the only UpdraftPlus plugin and placed the backup files from Dropbox to wp-config/UpdraftPlus directory and hit the restore button. Things worked like a charm, I got everything from the plugin, themes, pages, posts to media items set up exactly the same.
If you are into WordPress you may understand that the test I performed was more of a migration than the restore process. The extra step it involved was to change the site URL and home column values under wp_options table.
Conclusion
The UpdraftPlus plugin does what it says. You can schedule your backup and store it to your preferred cloud storage provider. Restoring website is an easy task. Additionally, this plugin will help you migrate your website from one hosting to another hosting as well.